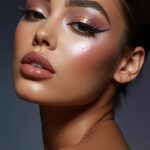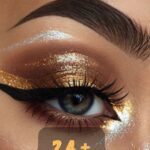
Once I was getting ready for a friend’s birthday dinner, feeling adventurous, and I grabbed this gorgeous champagne glitter from my makeup drawer.
Ten minutes later, I looked like I’d been attacked by a sparkly fairy—glitter everywhere except where I actually wanted it.
But here’s the thing: I didn’t give up.
Because when glitter makeup is done right, it’s absolute magic.
It transforms your whole look from “pretty” to “I spent an hour on this and I’m obsessed.”
And I’m here to tell you that bold glitter makeup isn’t just for Instagram influencers or New Year’s Eve parties.
You can make it wearable, gorgeous, and totally you.
I’ve spent years experimenting with glitter—from subtle inner corner highlights to full-on glam lids—and I’m sharing everything I’ve learned.
Let’s make you sparkle.
The Classic Glitter Cut Crease

This look is my absolute go-to when I want drama without looking overdone.
The cut crease creates this beautiful definition that makes your eyes look bigger and more awake.
Then you pack that glitter right onto your lid, and suddenly you’ve got dimension and light bouncing everywhere.
I like using a champagne or rose gold glitter for this because it feels luxe but not costume-y.
Here’s my trick: apply your crease color first with a matte transition shade—something that matches your skin tone or goes slightly deeper.
Then use a flat shader brush and concealer to carve out that crisp line where your lid begins.
Let the concealer get a little tacky (this is key), then press—don’t swipe—the glitter onto your lid using your finger or a flat packing brush.
The tackiness helps the glitter actually stick instead of falling all over your cheeks.
And honestly, this look works for date nights, weddings, or even a fancy brunch if you’re feeling yourself.
The glitter catches the light every time you blink, and it’s just so pretty.
If you’re nervous about going too bold, start with a smaller cut crease and build up.
You can always add more glitter, but it’s harder to take away.
Glitter Inner Corner Highlight

This is the gateway glitter look, and I’m obsessed.
If you’re new to glitter or just want something subtle that still makes an impact, this is where you start.
You take a tiny bit of fine glitter—I love a silver or icy white—and dab it right into the inner corners of your eyes.
It instantly brightens your whole face and makes you look more awake.
I do this on days when I’ve had three hours of sleep and need to fake being a functioning human.
The trick is to use a small, precise brush or even a cotton swab.
You want just a little pop, not a full glitter bomb.
And make sure the glitter is really fine and not chunky, because chunky glitter in your inner corner can feel irritating.
I also like to bring a tiny bit of that same glitter onto my brow bone, right under the arch.
It creates this lifted, highlighted effect that’s so gorgeous in photos.
Pair this with a simple winged liner and mascara, and you’ve got an elevated everyday look.
Seriously, this is the kind of thing that makes people say, “You look so glowing today!”
And you can just smile and say thank you while knowing it’s really just strategic glitter placement.
Bold Glitter Smokey Eye

A smokey eye is already sultry and gorgeous.
But add glitter?
You’re next level.
I love doing a deep, dramatic smokey eye with blacks and grays, then packing a dark glitter—like a gunmetal or deep burgundy—right into the center of the lid.
It’s moody, it’s bold, and it feels a little rock and roll in the best way.
The key to making this work is blending your dark shadows really well first.
You want that soft, diffused smokiness before you even think about the glitter.
Then, once you’ve got your base looking smooth, grab a glitter that has some depth to it.
A black or charcoal glitter with micro-sparkle works beautifully here.
Or, if you’re feeling daring, try a deep plum or forest green glitter.
Press it onto the center of your lid and maybe a touch along your lower lash line.
The contrast between the soft, blended edges and the sharp, sparkly center is just chef’s kiss.
I wore this look to a rooftop party last summer, and I swear every time the sun hit my eyes, people noticed.
Pair it with a nude lip or a bold red—both work.
And don’t skip the lashes; they balance out all that intensity.
Glitter Liner Magic

If you’re intimidated by a full glitter lid, try glitter liner instead.
It’s bold, it’s fun, and it’s way easier than you think.
You can use a liquid glitter liner (my lazy-girl favorite) or mix loose glitter with a mixing medium.
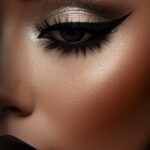
I love doing a classic black winged liner, then tracing right over it—or right next to it—with a glitter liner in silver or gold.
The effect is subtle from far away but super striking up close.
It’s perfect for parties, concerts, or honestly just a Tuesday when you want to feel fancy.
You can also skip the black liner entirely and just do a glitter wing.
I’ve done this with a bright turquoise glitter, and it was so fun and unexpected.
The key is to use a thin, angled liner brush if you’re applying loose glitter.
Mix it with a tiny bit of mixing medium or even just water to create a paste.
Then paint it on like you would regular liner.
Let it dry completely before you open your eye all the way, or you’ll get glitter in your crease.
And yes, there will be some fallout.
Keep a piece of tape or a makeup wipe nearby to catch any rogue sparkles.
This look is playful, easy, and makes you feel like the main character.
Glitter Ombré Lid

This is one of my favorite editorial-inspired looks that’s still totally wearable.
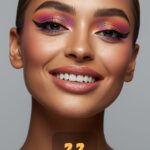
You start with a deeper shade in your crease—maybe a plum, bronze, or navy.
Then you gradually lighten toward your lid, finishing with a gorgeous glitter at the center.
The gradient effect is so soft and dimensional.
It’s like a sunset on your eyelids, and I’m here for it.
I’ll usually use a matte transition shade first, then a slightly deeper matte in the crease.
Blend, blend, blend.
Then I’ll apply a shimmer shadow that’s a shade lighter than my crease color onto the middle of my lid.
Finally, I press a glitter that’s even lighter or just more reflective onto the inner half of my lid and inner corner.
The transition from dark to light to sparkly is just so pretty.
And it works with any color story.
You could do warm browns with a gold glitter, cool taupes with a silver glitter, or even purples with a lavender glitter.
The key is making sure each shade blends seamlessly into the next.
I like to use a clean blending brush between each color to soften any harsh lines.
This look photographs beautifully, so it’s great for events or special occasions.
But honestly, I’ve worn it to brunch just because I felt like it.
Glitter Lower Lash Line Pop

This is such an underrated move.
Most people focus all their glitter energy on the upper lid and forget about the lower lash line.
But adding a pop of glitter along your lower lashes creates balance and makes your eyes look bigger.
I love using a thin brush to apply a line of glitter right along my lower lash line.
Sometimes I’ll match it to the glitter on my upper lid, and sometimes I’ll choose a contrasting color for a fun twist.
Like, if I have gold on my lids, I might add a pop of bronze or copper below.
It’s unexpected and really pretty.
The trick is to not go too thick.
You want a fine line of sparkle, not a chunky mess.
I also like to smudge a bit of the glitter into the outer corner to create a soft, smokey effect.
If you’re doing a full glitter lid, keeping the lower line simpler helps balance the look.
But if your upper lid is more neutral, you can go a bit bolder on the bottom.
I’ve even done a glitter lower lash line with zero glitter on top—just a simple neutral eye and mascara.
It’s subtle but striking, and people always ask what I did differently.
This is also a great trick if you have hooded eyes, because it draws attention downward and creates dimension.
Halo Glitter Eye


The halo eye is one of those looks that seems complicated but is actually pretty forgiving.
You apply a darker shade to your inner and outer corners, then place a lighter, shimmery shade—or in this case, glitter—right in the center of your lid.
The result is this gorgeous, lifted effect that makes your eyes look rounder and more open.
I love using a warm bronze or copper glitter for the center and deeper browns on the edges.
It’s warm, it’s glowy, and it feels really sophisticated.
Start by applying your transition shade in the crease.
Then take a darker matte shade and press it into your inner and outer corners, leaving the center of your lid bare.
Blend those edges so there’s no harsh line.
Now comes the fun part: pack your glitter onto the center of your lid.
I like to use my finger for this because it really presses the glitter in and maximizes the sparkle.
The contrast between the matte outer edges and the glittery center is what makes this look so stunning.
You can also add a touch of that same glitter to your inner corner and brow bone to tie everything together.
This look works for day or night, depending on how dark you go with your corner shades.
And it’s just really, really pretty.
Monochromatic Glitter Moment

I’m talking all one color family, but with varying textures and finishes.
So maybe you do a matte mauve in the crease, a shimmery mauve on the lid, and then a purple glitter packed onto the center.
Everything is cohesive, but the glitter adds that extra punch.
This is one of my favorite ways to wear glitter because it feels really intentional and polished.
It’s not just “I threw glitter on my face.”
It’s “I carefully curated this look, and yes, I know it’s gorgeous.”
The key is choosing shades that are in the same color family but have different depths and finishes.
So if you’re doing a pink look, you might use a soft pink matte, a rose shimmer, and a hot pink glitter.
The variation keeps it interesting, but the cohesion keeps it sophisticated.
I also love doing this with neutrals.
A taupe matte, a champagne shimmer, and a gold glitter?
Perfection.
Or go bold with a blue theme—navy matte, cobalt shimmer, and electric blue glitter.
It’s fun to play with.
And because everything is in the same color family, it’s actually pretty hard to mess up.
Just blend well and make sure your glitter is the star of the show.
This look is great for formal events, photoshoots, or anytime you want to feel put-together and glam.
Glitter Graphic Liner

This is for when you’re feeling bold and artsy.
Instead of a traditional winged liner, you create a graphic shape with glitter.
I’ve done glitter dots along my lash line, geometric shapes at the outer corner, and even a glitter underliner that extends past my natural eye shape.
It’s editorial, it’s fun, and it’s a total conversation starter.
The easiest way to do this is with a liquid glitter liner that has a precise applicator.
You can draw whatever shape you want without worrying about loose glitter going everywhere.
If you want to use loose glitter, grab a thin liner brush and a mixing medium.
Sketch out your design first with a pencil liner so you have a guide, then go over it with the glitter.
I love doing a floating glitter wing that sits above my natural crease.
Or a double wing—one black, one glitter.
You can also create a glitter cut crease that’s sharper and more defined than the soft version.
The possibilities are honestly endless.
This look takes a little more time and a steady hand, but the payoff is so worth it.
I wore a glitter graphic liner to a music festival, and I felt like an actual work of art.
Just make sure to set everything with a setting spray so your design lasts all day or night.
Subtle Glitter Wash

Sometimes you don’t want drama—you just want a little extra something.
That’s where the glitter wash comes in.
You sweep a sheer, fine glitter all over your lid for a soft, ethereal glow.
It’s barely there, but it catches the light in the prettiest way.
I love this for daytime events, bridal makeup, or when I want to look polished but not overdone.
The key is using a really fine glitter—almost more of a shimmer—and applying it with a light hand.
I’ll usually do this over a neutral base, like a soft beige or cream shadow.
Then I take a fluffy brush and dust a champagne or pale gold glitter across the entire lid.
It’s subtle, but it adds dimension and light.
You can also do this with a glitter spray or a liquid shadow that has fine sparkle.
Just mist it over your lids or pat it on gently.
This look is perfect if you’re not a “glitter person” but still want to experiment.
It’s not in-your-face sparkle; it’s just a soft, glowy finish.
I wore this to a spring wedding, and it looked so fresh and pretty in the outdoor lighting.
Pair it with natural brows, soft lashes, and a pink lip, and you’re golden.
Bold Glitter with a skin color Base

This is one of my sneaky tricks for making glitter look expensive instead of crafty.
You keep the rest of your eye really simple—neutral mattes, soft blending—and then you pack bold glitter onto just one area.
Maybe it’s the center of your lid, or just your outer corner, or even a glitter halo around your iris.
The contrast between the understated base and the bold glitter makes the glitter look intentional and high-end.
I love doing this with jewel-toned glitters—emerald, sapphire, ruby.
The richness of the color against a soft nude base is just stunning.
Start with a matte nude or taupe shadow all over your lid and crease.
Keep everything soft and blended.
Then choose your glitter and decide where you want to place it.
I usually go for the outer corner or the center of the lid.
Press it on with your finger or a flat brush, and don’t blend it out.
You want a defined pop of sparkle, not a diffused glow.
The rest of your eye stays neutral, so the glitter becomes the focal point.
This look is sophisticated, modern, and really versatile.
You can adjust the boldness by changing the size of the glitter patch.
A small pop is perfect for the office (if you’re brave), and a larger patch is great for evening events.
Glitter and Bold Lip Combo

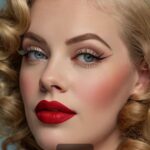
Here’s a styling tip that changed the game for me: you can absolutely wear glitter eyes with a bold lip.
For the longest time, I thought it was one or the other.
But then I tried a glitter smokey eye with a deep berry lip, and I was hooked.
The trick is making sure the glitter and the lip color complement each other.
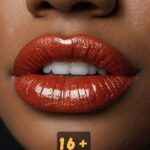
If you’re doing warm-toned glitter—like gold or copper—pair it with a warm red or terracotta lip.
If you’re doing cool-toned glitter—like silver or icy blue—go for a cool pink or berry lip.
The colors should feel like they’re in the same family, even if they’re different features.
I also like to keep my cheeks pretty neutral when I’m doing glitter eyes and a bold lip.
Just a soft contour and a hint of blush.
You don’t want too many focal points competing for attention.
But the eyes and lips?
They can absolutely coexist.
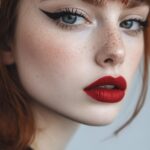
I wore a gold glitter lid with a matte brick-red lip to a holiday party, and I felt like a whole vibe.
The glitter added sparkle and fun, while the bold lip added sophistication and edge.
It’s a power combo, and I’m never going back to the “pick one feature” rule.
Life’s too short to not wear glitter and red lipstick at the same time.
My Glitter Application Tips and Tricks

Okay, let’s talk about the practical stuff, because glitter can be messy if you don’t have a game plan.
First, always do your eye makeup before your base makeup if you’re using loose glitter.
That way, any fallout lands on bare skin and you can just wipe it away.
Or, use the tape trick: place a piece of tape under your eye to catch the glitter, then peel it off when you’re done.
I also swear by a glitter primer or mixing medium.
It makes the glitter stick and stay put all day.
You can use a tacky eyeshadow base, a little bit of concealer, or an actual glitter glue.
Just let it get slightly sticky before you press the glitter on.
And always press, never swipe.
Swiping just spreads the glitter around and reduces the intensity.
Pressing locks it in and gives you maximum sparkle.
For removal, don’t rub your eyes like crazy.
Use a good oil-based makeup remover or micellar water on a cotton pad, press it onto your lid for a few seconds, then gently wipe.
The glitter will come off without tugging at your delicate eye area.
And if you’re nervous about glitter getting everywhere, just embrace it.
A little sparkle on your cheeks never hurt anyone.
That’s what I tell myself, anyway, when I find glitter in my hair three days later.
So there you have it—my favorite bold glitter makeup looks and all the tips I’ve learned along the way.
Glitter isn’t scary, and it’s definitely not just for special occasions.
It’s for whenever you want to feel a little more like yourself, a little more confident, a little more sparkly.
Go play, experiment, and don’t be afraid to shine.