Get ready to go bananas over the most adorable nail art trend that’s taking social media by storm!
Monkey nail designs are swinging into the spotlight, and trust us, you’ll want to jump on this trend before everyone else catches on.
Ordering press-ons? The free manicure type finder reads your nail widths on four brands’ size charts.
These playful primate designs are perfect for anyone who loves cute, whimsical nail art that’s guaranteed to make people smile.
Banana Split Monkey Madness

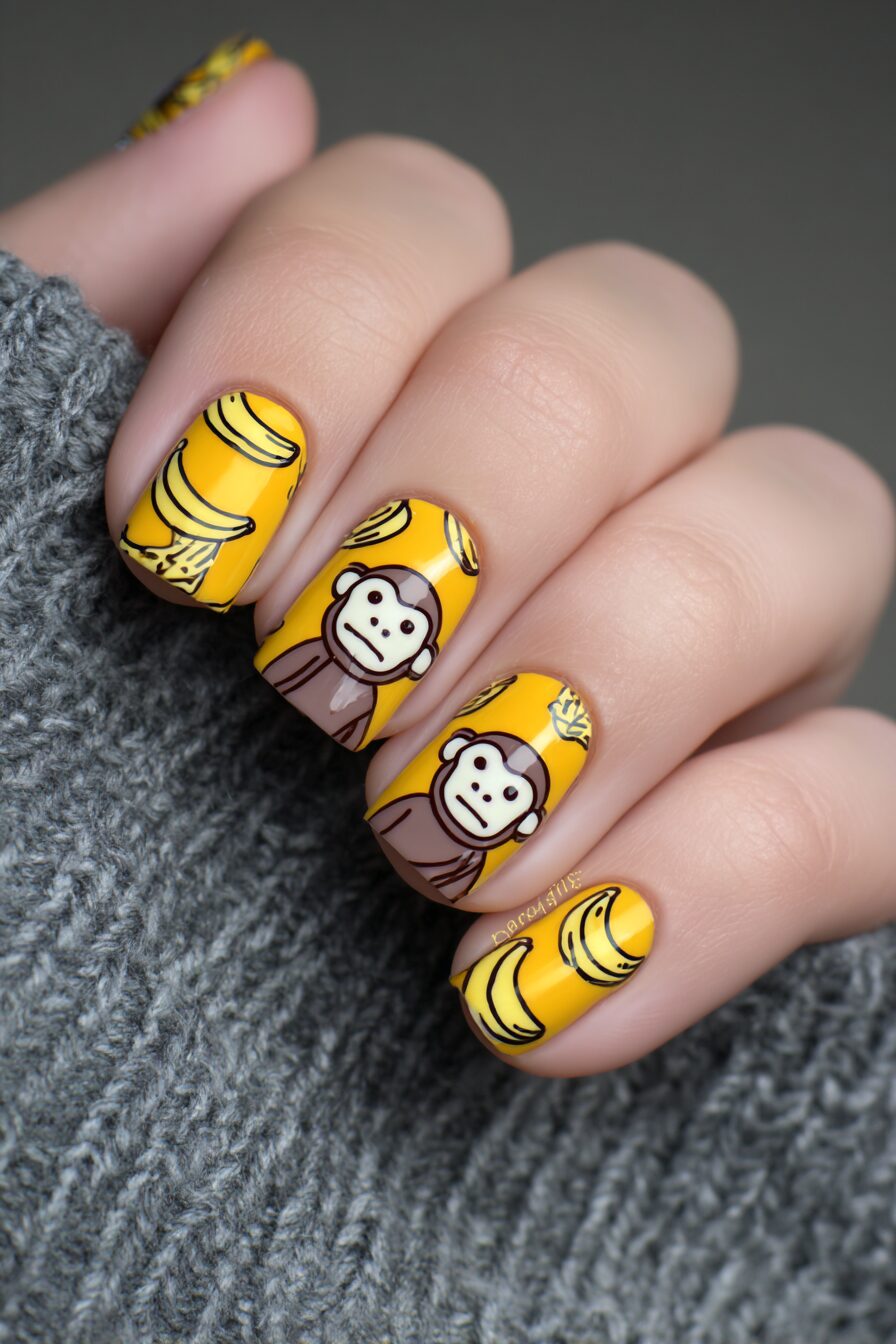
You’ll absolutely love this sweet design that combines everyone’s favorite monkey snack with adorable primate faces.
Start by painting your base coat in a soft yellow shade that mimics the color of ripe bananas.
Once your base is completely dry, use a thin nail art brush to paint tiny brown monkey faces on your ring finger and thumb.
Add small black dots for eyes and a curved line for the mouth to bring your monkey to life.
On your remaining nails, paint vertical yellow and white stripes to represent banana peels.
Use a detail brush to add brown spots on the banana sections, making them look realistic and appetizing.
The key to making this design pop is adding tiny green leaves at the base of each banana nail.
You can create these leaves using a dotting tool dipped in forest green polish.
For extra dimension, add a thin coat of clear glitter polish over the entire design.
This creates a subtle sparkle that catches the light beautifully.
Don’t forget to seal everything with a high-quality top coat to ensure your monkey madness lasts for weeks.
The contrast between the playful monkey faces and the geometric banana stripes creates visual interest that’s both fun and sophisticated.
This design works perfectly for summer parties, tropical vacations, or any time you want to add a touch of whimsy to your look.
The yellow base color complements almost every skin tone, making this design universally flattering.
You can customize the monkey expressions by changing the mouth shapes – try surprised, happy, or even winking faces.
For a more subtle approach, paint the monkeys on just one accent nail and keep the banana design on the rest.
This nail art is perfect for beginners since the shapes are simple and forgiving.
Even if your monkey faces aren’t perfectly symmetrical, they’ll still look absolutely charming.
The banana and monkey combination is instantly recognizable and never fails to bring smiles to people’s faces.
Swinging Safari Adventure

Transport your fingertips to the heart of the jungle with this dynamic design featuring monkeys in their natural habitat.
Begin with a gradient base using brown and green polishes to create an earthy, forest-like background.
Apply the darker brown shade at the base of each nail, blending upward into a lighter green at the tips.
This gradient technique gives your nails depth and creates the perfect backdrop for your safari scene.
Once your gradient base is dry, use a thin liner brush to paint tree branches across several nails.
Make these branches irregular and organic-looking, just like real tree limbs in the wild.
The branches should connect across multiple nails to create a cohesive jungle canopy effect.
Now comes the fun part – adding your swinging monkeys to the scene.
Use a small detail brush to paint monkey silhouettes hanging from the branches.
You can show them in various poses: swinging with one arm, hanging upside down, or reaching for imaginary fruit.
The key is to make each monkey look like it’s in motion, bringing energy and life to your design.
Add small touches of bright colors with tiny tropical flowers or leaves scattered throughout the scene.
These pops of color will make your jungle theme feel vibrant and alive.
Use a dotting tool to create small birds flying between the trees, adding even more movement to your safari adventure.
For the finishing touch, apply a matte top coat to give your jungle scene an authentic, natural appearance.
The matte finish eliminates shine and makes the design look more like an actual painting.
This nail art tells a complete story across all ten nails, creating a mini masterpiece on your fingertips.
You can adjust the complexity based on your skill level – beginners can focus on simple monkey shapes, while advanced nail artists can add intricate details like facial features and fur textures.
The earthy color palette makes this design surprisingly versatile and suitable for both casual and professional settings.
Cute Cartoon Monkey Faces

Nothing beats the pure joy of having adorable cartoon monkey faces smiling back at you from your fingertips.
This design focuses on creating the sweetest, most expressive monkey characters that will melt everyone’s hearts.
Start with a soft peach or light brown base color that serves as the perfect canvas for your monkey faces.
The neutral base ensures your cartoon monkeys will be the star of the show without competing colors.
Once your base coat is completely dry, use a medium round brush to paint oval shapes for the monkey faces.
Make each face slightly different in size and position to create variety across your nails.
The beauty of cartoon monkeys lies in their imperfect, hand-drawn appearance that adds to their charm.
Use black polish and a very fine brush to add the facial features that bring your monkeys to life.
Start with two small dots for the eyes, placing them close together for that classic cute animal look.
Add a tiny curved line between the eyes for the nose, keeping it simple and sweet.
The mouth is where you can really show personality – try different expressions like big smiles, surprised “O” shapes, or even little tongues sticking out.
Don’t forget the signature monkey ears that make these characters instantly recognizable.
Paint two small circles on either side of each face, then add a smaller pink circle inside each ear.
For extra cuteness, add small curved lines above the eyes to represent eyebrows or forehead wrinkles.
You can give some monkeys rosy cheeks by dabbing a tiny amount of pink polish with a cotton swab.
This technique adds warmth and makes your cartoon characters look even more lovable.
Vary the expressions across your nails – have some monkeys winking, others smiling with closed eyes, and a few looking surprised.
The personality differences will make people want to examine each nail individually.
Finish with a glossy top coat to make the colors pop and give your cartoon monkeys a professional, polished appearance.
This design is perfect for anyone who loves kawaii culture or simply wants to carry a little happiness with them everywhere they go.
Minimalist Monkey Silhouettes

Sometimes the most powerful designs are the simplest ones, and these elegant monkey silhouettes prove that point perfectly.
This sophisticated approach to monkey nail art offers a chic alternative that works in any setting.
Begin with a clean, crisp white base coat that provides the perfect contrast for your black silhouettes.
The stark white background ensures your monkey shapes will appear bold and dramatic.
Allow your base coat to dry completely before moving on to the silhouette creation process.
Using a thin liner brush and black polish, paint simple monkey outlines on alternating nails.
Focus on creating clean, recognizable shapes that capture the essence of a monkey without unnecessary details.
The key to successful silhouettes is understanding which features are most important for recognition.
Include the distinctive monkey posture with a curved back and long tail for instant identification.
You can show monkeys in different positions – sitting, reaching upward, or hanging from an invisible branch.
The beauty of silhouettes lies in their ability to convey movement and personality through shape alone.
On the nails without monkeys, add simple black geometric elements like thin lines or small dots.
These minimal additions create visual balance without overwhelming the overall design.
The contrast between the detailed monkey silhouettes and simple geometric elements creates sophisticated visual interest.
For a modern twist, try using different shades of gray instead of pure black for some of the silhouettes.
This tonal variation adds depth while maintaining the minimalist aesthetic.
You can also experiment with different base colors – navy blue, deep burgundy, or even soft gray can create stunning alternatives to the classic black and white combination.
The silhouette technique is forgiving for beginners since perfect details aren’t necessary.
As long as the overall shape reads as “monkey,” your design will be successful.
This style translates beautifully to both short and long nails, making it universally wearable.
The clean lines and simple shapes ensure your manicure will look polished and intentional rather than busy or chaotic.
Finish with a high-gloss top coat to create a sleek, modern appearance that’s suitable for any occasion.
Funky Monkey with Sunglasses

Get ready to rock the coolest nail design that screams personality and attitude with these sunglasses-wearing monkeys.
This playful design combines retro vibes with modern sass, creating nails that are impossible to ignore.
Start with a bright, bold base color that matches the funky energy of your design.
Electric blue, hot pink, or sunny yellow all work perfectly as backgrounds for your cool monkey characters.
The vibrant base color sets the stage for a design that’s all about fun and self-expression.
Once your colorful base is dry, use a medium brush to paint monkey face shapes in a contrasting color.
Brown monkeys look fantastic on bright backgrounds, while lighter monkeys pop against darker bases.
The key is creating enough contrast so your monkeys stand out dramatically from the background.
Now for the star of the show – those iconic sunglasses that give your monkeys instant cool factor.
Use a fine liner brush and black polish to paint classic aviator or wayfarer-style sunglasses.
Make the frames bold and oversized for maximum impact and retro appeal.
Add small white dots or lines to represent the reflection on the lenses, making the sunglasses look realistic and dimensional.
You can vary the sunglasses styles across different nails – try cat-eye shapes, round frames, or even futuristic designs.
This variety keeps the design interesting and shows off your creativity.
Add small details like a backwards baseball cap on one monkey or a tiny gold chain around another’s neck.
These accessories enhance the cool factor and make each monkey character unique.
Don’t forget to add facial features that work with the sunglasses – a confident smirk or a casual, relaxed expression.
The personality you give each monkey will shine through despite the covered eyes.
For extra funk, add small decorative elements around the monkeys like stars, lightning bolts, or geometric shapes.
These additional graphics enhance the retro-cool vibe and fill any empty space beautifully.
Use metallic polishes for some of these accent elements to add shine and glamour.
Finish with a glossy top coat that makes the entire design pop with vibrant color and shine.
This design is perfect for music festivals, beach vacations, or any time you want to show off your playful side.
Baby Monkey Family Fun

Prepare to have your heart completely melted by the sweetest family design featuring mama monkeys and their adorable babies.
This touching nail art celebrates the beautiful bond between monkey families while creating an incredibly cute manicure.
Begin with a soft, warm base color like cream or light tan that provides a gentle backdrop for your family scene.
The neutral base allows the emotional connection between the monkey characters to be the focal point.
Your family design will span across multiple nails, creating a storytelling element that unfolds as people look at your hands.
Start by painting the mama monkey on your ring finger using a slightly larger brush for the bigger character.
Give mama monkey a gentle, protective posture with arms positioned to hold or embrace her little one.
The maternal pose should convey love and care through body language alone.
On the adjacent nail, paint the baby monkey in a smaller size, showing it reaching toward or cuddling with mama.
The size difference between the characters immediately establishes the parent-child relationship.
Use slightly different shades of brown to distinguish between family members while keeping them harmonious.
Add facial expressions that convey the loving relationship – mama with a gentle smile and baby with wide, trusting eyes.
The eyes are particularly important in this design as they express the emotional connection between the characters.
You can show baby monkey in various adorable poses like clinging to mama’s back or reaching up with tiny arms.
On your other nails, add environmental elements that complete the family scene.
Paint small hearts floating around the family to emphasize the love theme.
Include tiny flowers or leaves to create a peaceful, natural setting for your monkey family.
These background elements should be subtle enough not to distract from the main characters.
For extra sweetness, add small details like baby monkey wearing a tiny diaper or mama having a flower behind her ear.
These little touches add personality and make the characters more endearing.
The key to this design is capturing the tender moment between parent and child that resonates with viewers.
Use a satin finish top coat rather than high gloss to give the design a soft, gentle appearance that matches the tender theme.
This design is perfect for baby showers, Mother’s Day, or any time you want to celebrate family bonds.
Tropical Monkey Paradise

Transform your nails into a vibrant tropical getaway where playful monkeys frolic among exotic flowers and palm trees.
This design captures the essence of a perfect vacation destination right on your fingertips.
Start with a gradient base that transitions from sky blue at the cuticle to sandy beige at the tips.
This gradient creates the illusion of a tropical beach scene with sky meeting sand.
Allow each color to blend naturally for the most realistic tropical atmosphere.
The gradient technique requires patience but creates a stunning foundation that elevates the entire design.
Once your tropical base is set, begin adding your paradise elements starting with palm trees.
Use a thin brush to paint tall, graceful palm tree trunks in various heights across several nails.
The trees should appear to sway gently, creating movement and natural flow.
Add palm fronds at the top of each trunk using quick, feathery strokes that mimic real palm leaves.
Now introduce your monkey characters swinging and playing among the tropical scenery.
Paint them in playful poses – hanging from palm fronds, sitting on branches, or reaching for coconuts.
Each monkey should appear to be enjoying their tropical paradise to the fullest.
Use vibrant colors for tropical flowers scattered throughout the scene.
Bright pink hibiscus, orange bird of paradise, and purple orchids add authentic tropical flair.
These colorful blooms create focal points and add visual interest between the monkey characters.
Add small details like coconuts hanging from palm trees or colorful tropical birds flying overhead.
These elements build a complete ecosystem that feels alive and vibrant.
The layering of different elements creates depth and makes your nails look like miniature tropical paintings.
Use a sponging technique to add subtle clouds to the sky portion of your gradient.
This adds realism and enhances the tropical atmosphere.
For the water element, add small white dots and curved lines to represent gentle waves lapping at the shore.
The combination of all these tropical elements creates a cohesive paradise scene that transports viewers to their dream vacation destination.
Finish with a high-gloss top coat to mimic the bright, sunny appearance of a perfect tropical day.
This design is ideal for summer parties, beach vacations, or whenever you need a mental escape to paradise.
Glitter Monkey Celebration

Get ready to party with the most dazzling monkey nail design that combines cute characters with serious sparkle.
This glamorous approach to monkey nail art proves that cute and sophisticated can coexist beautifully.
Begin with a base coat of champagne or rose gold polish that provides a luxurious foundation for your glittery celebration.
The metallic base creates an elegant backdrop that makes your glitter elements appear even more spectacular.
Allow your base to dry completely before beginning the glitter application process.
Using a makeup sponge, dab fine holographic glitter over the entire nail surface for an all-over sparkle effect.
The holographic glitter creates rainbow reflections that change as you move your hands in the light.
This creates an dynamic, celebratory atmosphere perfect for special occasions.
Once your glitter base is established, use a medium brush to paint monkey silhouettes in a slightly darker metallic shade.
The monkeys should be recognizable but subtle, allowing the glitter to remain the star of the show.
Paint your monkeys in festive poses like dancing, jumping with joy, or throwing confetti in the air.
These celebratory poses enhance the party atmosphere of your design.
Add small touches of bright glitter in different colors to represent party confetti scattered around your dancing monkeys.
Use a dotting tool to place individual glitter pieces strategically for maximum impact.
The contrast between the holographic base glitter and the colored accent glitter creates visual depth and interest.
For extra celebration vibes, paint tiny balloons floating around some of your monkey characters.
Use bright, happy colors for the balloons and add thin strings connecting them to create realistic balloon effects.
You can also add small stars or fireworks bursts using different colored glitters for variety.
The key is building layers of celebratory elements that work together to create one cohesive party scene.
Each nail should contribute to the overall celebration while maintaining its own unique glittery personality.
Pay attention to glitter placement – some areas should be more dense while others remain lighter for visual balance.
The varying glitter density creates movement and prevents the design from looking flat or uniform.
Use a thick, high-quality top coat to seal all the glitter elements and prevent them from catching on clothing.
Multiple thin coats work better than one thick application for securing glitter effectively.
This design is perfect for New Year’s Eve, birthdays, graduations, or any celebration that calls for extra sparkle and glamour.
3D Monkey Magic

Prepare to be amazed by the incredible dimension and realism that 3D techniques bring to your monkey nail art.
This advanced design creates monkeys that literally appear to pop off your nails with stunning three-dimensional effects.
Start with a neutral base color that won’t compete with your 3D elements for attention.
Soft beige or light gray provides the perfect canvas for dimensional monkey features to stand out dramatically.
The key to successful 3D nail art lies in building layers gradually and allowing each element to dry completely.
Begin by creating the basic monkey shape using regular polish as your foundation layer.
This flat base serves as the structure for your three-dimensional elements to build upon.
Once your base monkey shape is dry, use acrylic paint or thick gel polish to begin adding dimensional features.
Start with the monkey’s nose and snout area, building up the polish to create actual raised surfaces.
The nose should project slightly from the nail surface, creating realistic facial contours.
Use a small brush to sculpt the raised areas while the polish is still workable.
This technique requires practice but creates incredibly realistic results.
Add dimensional ears by applying thick polish in circular shapes and using a tool to create the inner ear depression.
The ears should appear to stick out from the sides of the monkey’s head naturally.
For the eyes, use small rhinestones or dome-shaped nail decorations to create realistic, reflective surfaces.
These 3D eyes bring your monkey characters to life with incredible realism.
Build up the monkey’s limbs using the layering technique, making arms and legs appear to extend beyond the nail surface.
You can even have a monkey’s arm “reaching” from one nail toward another for ultimate dimensional effect.
Add texture to your 3D monkeys using a stippling technique with a small sponge.
This creates the appearance of fur and adds to the realistic three-dimensional illusion.
The texture work is what transforms your design from simply raised polish to convincingly realistic monkey characters.
Use different shades of brown and highlight colors to enhance the dimensional effect through strategic shading.
Lighter colors on raised areas and darker tones in recessed spaces create natural-looking shadows and highlights.
Finish with a careful application of top coat, being sure not to flatten your dimensional elements.
This advanced technique requires patience and practice but creates stunning results that will amaze everyone who sees your nails.
Monkey Treat Time Delight


Indulge in the sweetest nail design featuring monkeys enjoying all their favorite delicious treats and snacks.
This mouth-watering design combines adorable monkey characters with colorful food elements that look good enough to eat.
Begin with a soft pastel base in mint green or baby pink that evokes the feeling of a sweet candy shop.
The gentle base color creates a whimsical atmosphere perfect for showcasing your food-themed monkey adventure.
Your treat time design will feature monkeys interacting with various foods across multiple nails for a complete dining experience.
Start by painting your main monkey character on your ring finger, showing it with a big, satisfied smile.
This central character sets the happy, indulgent mood for your entire treat time theme.
Give your main monkey rosy cheeks and a slightly rounded belly to show it’s been enjoying lots of delicious food.
On adjacent nails, paint smaller monkeys holding or reaching for different treats.
One monkey can be clutching a bunch of grapes, another reaching for a shiny red apple.
The variety of fruits and treats creates visual interest and tells a complete snacking story.
Add dimensional elements like actual tiny plastic bananas or fruit charms if you want to enhance the realism.
These 3D food elements make the design more interactive and fun to touch.
Paint colorful ice cream cones, cupcakes, and candy scattered around your monkey characters.
Use bright, appealing colors that make the treats look as delicious as possible.
Pink strawberry ice cream, chocolate brown cupcakes, and rainbow-colored candies all add to the sweet atmosphere.
Add small details like sprinkles on cupcakes or dripping ice cream for extra realism.
These tiny touches make the food elements more convincing and appetizing.
Don’t forget to include some healthy options like carrots or nuts to show your monkeys have balanced diets.
The mix of healthy and indulgent treats creates a more complete and realistic food scene.
Use a dotting tool to add small crumbs around eating monkeys to show they’re actively enjoying their snacks.
These environmental details enhance the storytelling aspect of your design.
For extra sweetness, add tiny hearts floating around particularly happy monkeys to show their love for their treats.
The hearts emphasize the joy and satisfaction that comes from enjoying delicious food.
Finish with a glossy top coat that makes all the food elements look shiny and fresh.
This design is perfect for foodies, dessert lovers, or anyone who wants to carry a little sweetness with them everywhere.
These adorable monkey nail designs offer something special for every personality and occasion.
The best part about monkey nail art is how it instantly brings smiles to people’s faces and starts conversations wherever you go.