Nothing screams fun in the sun quite like watermelon nail art that’ll have everyone doing double-takes at your fingertips.
Torn between gel, acrylic and dip? The free manicure type finder picks the type for how long you want it and for your own nails.
These playful designs capture all the sweetness of your favorite summer fruit while giving you that perfect pop of color that’ll make your manicure the talk of every poolside party and beach hangout.
Classic Pink and Green Watermelon Slices

You can’t go wrong with the timeless watermelon slice design that brings instant summer energy to your nails.
Start with a soft pink base that mimics the juicy flesh of a fresh watermelon, making sure to get that perfect cotton candy hue that screams sweetness.
Paint a thin white line along the edge of each nail to create that distinctive rind separation that makes watermelons so recognizable.
Add a bold green tip that represents the outer skin, using a deep forest or emerald shade that contrasts beautifully with the pink base.
The magic happens when you dot tiny black seeds randomly across the pink section using a fine nail art brush or even a toothpick for precision.
Make sure your seeds are different sizes and placed irregularly to mimic how real watermelon seeds naturally appear in the fruit.
This design works perfectly on shorter nails where you want maximum impact without overwhelming your fingers.
You can make each nail slightly different by varying the thickness of the white line or the placement of seeds for a more organic, realistic look.
The beauty of this classic approach lies in its simplicity – it’s instantly recognizable and never goes out of style during summer months.
Try alternating between matte and glossy finishes on different nails to add texture and visual interest to your watermelon masterpiece.
For extra durability, seal everything with a high-quality top coat that’ll keep your fruity design looking fresh for weeks.
This timeless design pairs perfectly with everything from sundresses to bikinis, making it the ultimate versatile summer nail art choice.
Geometric Watermelon Triangles


Transform your nails into modern art pieces with angular watermelon triangles that bring a contemporary twist to this classic fruit theme.
Create sharp, clean triangular shapes across each nail using tape or nail stencils to achieve those perfectly crisp edges that make geometric designs so striking.
Start by painting your entire nail with a pale pink or white base coat that’ll make your watermelon triangles really pop against the neutral background.
Once dry, position your triangular stencils strategically across each nail, making sure some triangles are larger while others remain smaller for visual variety.
Fill in each triangle with that signature watermelon pink, making sure to get good coverage that looks rich and vibrant.
Add the characteristic green rind by painting a thin line along one edge of each triangle, creating that instant watermelon recognition factor.
The white separation line comes next, painted as a delicate stripe between the pink flesh and green rind sections.
Scatter tiny black seed dots within the pink triangular areas, but keep them minimal and strategic rather than overwhelming the clean geometric aesthetic.
This design works exceptionally well on longer nails where you have more canvas space to play with different triangle sizes and arrangements.
You can create a cohesive look by using the same triangle orientation on all nails, or mix it up with different angles for a more dynamic appearance.
The geometric approach feels fresh and modern while still maintaining that playful watermelon charm that makes people smile.
Try varying the number of triangles per nail – some nails might feature one large triangle while others showcase multiple smaller ones for visual rhythm.
This sophisticated take on watermelon nail art works beautifully for both casual summer outings and more polished occasions where you want something unique but not too over-the-top.
Watermelon French Tips


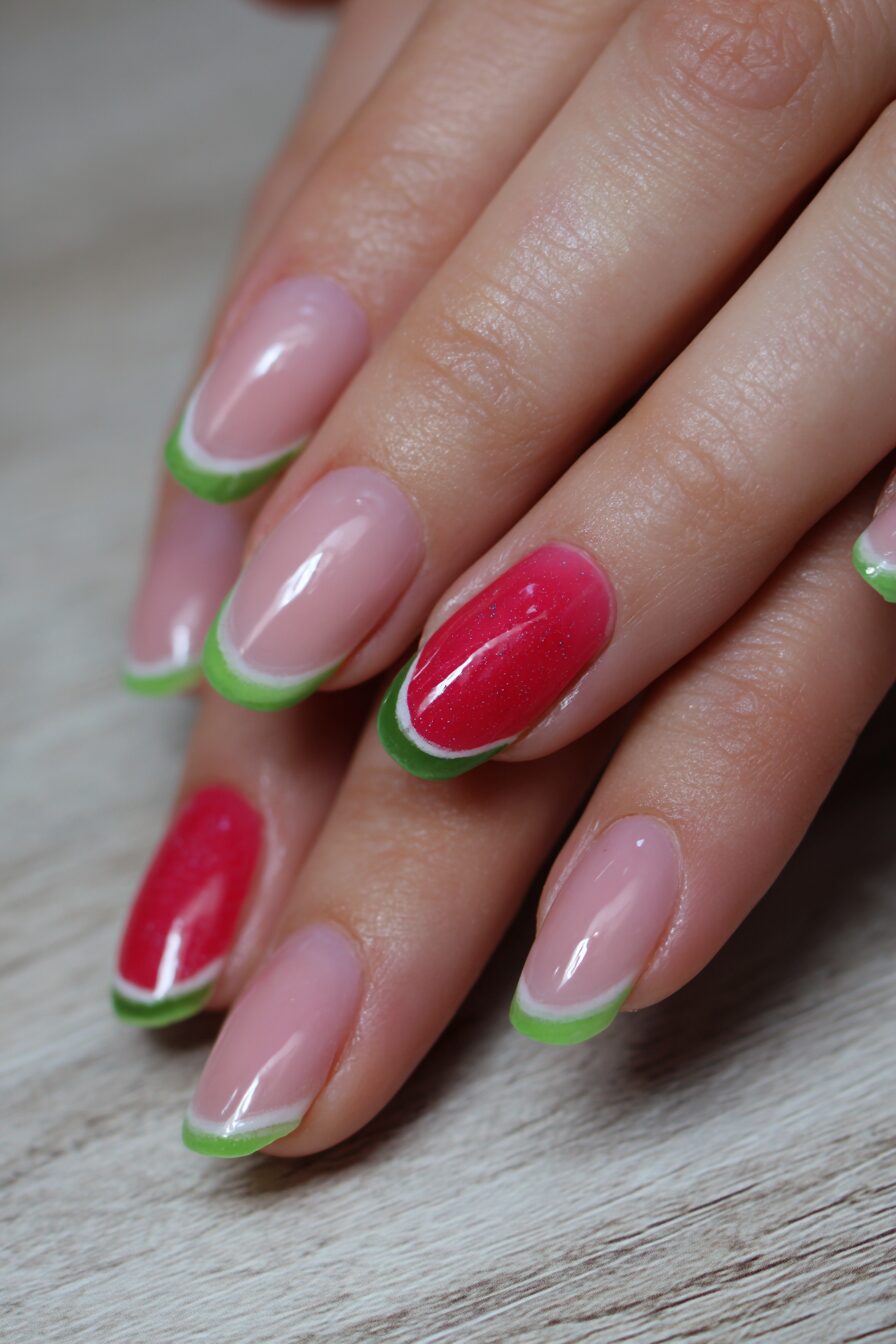
Elevate the classic French manicure with a juicy watermelon twist that brings summer freshness to this timeless nail art style.
Replace the traditional white tips with vibrant watermelon colors that’ll make your French manicure anything but ordinary.
Start with a clear or nude base coat that lets the watermelon colors really shine while maintaining that clean, polished French manicure foundation.
Paint the tips of your nails with that gorgeous watermelon pink, making sure to follow the natural curve of your nail for the most flattering French tip shape.
Add a thin green line just below the pink tip to represent the watermelon rind, creating that distinctive fruit appearance.
The white separation line goes between the pink and green sections, painted as a delicate stripe that mimics the natural division in real watermelons.
Sprinkle tiny black seeds sparingly across the pink tips, keeping them small and understated to maintain the elegant French manicure aesthetic.
This design offers the perfect balance between playful summer vibes and sophisticated nail art that works for both casual and professional settings.
You can adjust the thickness of your watermelon tips based on your preference – thicker tips make a bolder statement while thinner ones feel more subtle.
The French tip approach works beautifully on all nail lengths, from short and practical to long and dramatic.
Try alternating between traditional curved French tips and modern straight-across tips for a contemporary twist on this fruity design.
For extra elegance, keep the seeds minimal or even skip them entirely on some nails for a cleaner, more refined appearance.
This versatile design transitions seamlessly from beach days to office meetings, proving that watermelon nail art can be both fun and sophisticated.
Ombre Watermelon Sunset

Create a dreamy gradient effect that captures the beautiful color transition from watermelon flesh to rind in a stunning ombre design.
Start with the lightest pink shade at the base of your nail, using a color that resembles the palest part of watermelon flesh near the rind.
Gradually blend deeper and richer pink tones as you move toward the center of your nail, creating that luscious watermelon flesh appearance.
The magic happens in the blending technique – use a makeup sponge to dab and blend the colors seamlessly together for that perfect gradient effect.
Work quickly while the polish is still wet to achieve the smoothest color transitions that look natural and professional.
Add touches of coral or peachy pink in the middle sections to create depth and dimension that mimics real watermelon coloring.
Incorporate subtle hints of white throughout the ombre to represent those lighter streaks you often see in watermelon flesh.
The green rind section appears at the tips, blending from light sage green into deeper forest green for a realistic watermelon skin effect.
Tiny black seeds scattered throughout the pink gradient areas complete the watermelon illusion while adding authentic detail.
This technique requires patience and practice, but the stunning results are absolutely worth the extra effort and time investment.
The ombre effect creates a sophisticated look that feels more artistic than traditional nail designs while maintaining that playful watermelon theme.
Try using different pink tones on each nail to create variety while keeping the overall cohesive watermelon color story intact.
This gradient approach works beautifully on longer nails where you have more space to showcase the full color transition from light to dark.
Minimalist Watermelon Accents


Sometimes less is definitely more, and these subtle watermelon touches prove that simple designs can make the biggest impact.
Paint most of your nails in a neutral base color like soft pink, cream, or even clear polish to keep the focus on your watermelon accent nails.
Choose just one or two nails per hand to feature watermelon designs, creating focal points that draw attention without overwhelming your overall look.
The accent nails can showcase any watermelon design you love – from simple slices to geometric patterns or even tiny watermelon illustrations.
This approach works perfectly for people who want to embrace the watermelon trend without committing to a full fruity manicure on every finger.
You can rotate which nails get the watermelon treatment, perhaps featuring them on your ring fingers or thumbs for maximum visual impact.
The neutral base nails can incorporate subtle watermelon colors like soft pink or sage green to tie the whole look together cohesively.
This minimalist approach feels sophisticated and modern while still bringing that playful summer energy to your fingertips.
Try using different watermelon designs on your accent nails rather than repeating the same pattern for added visual interest.
The beauty of this technique lies in its versatility – you can easily switch up which nails feature watermelon designs based on your mood or outfit.
Minimalist watermelon accents work beautifully in professional environments where you want a touch of personality without being too bold or distracting.
This subtle approach also makes your manicure last longer since you’re not dealing with complex designs on every single nail.
You can gradually add more watermelon elements over time, starting minimal and building up to more elaborate designs as you become more comfortable with the trend.
Watermelon Polka Dots

Transform traditional polka dot nail art into a sweet watermelon celebration that brings retro charm with a fruity twist.
Start with a soft pink base coat that serves as your watermelon flesh background, making sure to get even coverage that looks smooth and professional.
Create polka dots in various watermelon-inspired colors including different shades of pink, green, white, and tiny black accents that represent seeds.
Use a dotting tool or the rounded end of a bobby pin to create perfectly circular dots that are uniform in size and shape.
Vary the sizes of your dots to create visual interest – larger dots can represent watermelon slices while smaller ones add texture and movement.
The green dots represent pieces of watermelon rind, scattered randomly among the pink dots for that authentic fruit medley appearance.
White dots serve as the rind separation and also add brightness that makes the other colors pop more dramatically.
Tiny black dots sprinkled throughout represent watermelon seeds, but keep them smaller than your other dots to maintain proper proportion.
This playful design feels retro and fun while maintaining a polished appearance that works for various occasions and outfit choices.
You can create patterns with your dots – perhaps arranging them in diagonal lines or clustering them in certain areas for more structured designs.
The polka dot approach works beautifully on all nail lengths and shapes, making it an inclusive design that flatters everyone.
Try using matte and glossy top coats on alternating nails to add texture variation that makes your polka dot design even more interesting.
This cheerful design brings instant happiness and summer vibes that’ll put a smile on your face every time you look at your hands.
Abstract Watermelon Art

Embrace your inner artist with freeform watermelon designs that let creativity flow without worrying about perfect lines or symmetrical patterns.
Let your brush dance across each nail with flowing movements that create organic watermelon-inspired shapes and color combinations.
Start with loose brushstrokes in various pink tones, allowing them to overlap and blend naturally for an artistic, painterly effect.
Add splashes of green that represent rind sections, but don’t worry about making them perfectly shaped or positioned – randomness adds to the artistic appeal.
Incorporate white brushstrokes that flow between the pink and green areas, creating movement and visual interest throughout your abstract composition.
Scatter black dots irregularly to represent seeds, varying their sizes and placement to maintain that spontaneous, artistic feeling.
This technique encourages experimentation and personal expression, making each nail a unique piece of wearable art that tells your creative story.
The abstract approach means there’s no wrong way to do it – every brushstroke adds to the overall artistic composition and watermelon theme.
Try using different brush sizes and techniques, from bold strokes to delicate details that create texture and depth in your abstract design.
This style works particularly well if you enjoy experimenting with nail art and want something that feels completely unique and personal.
The beauty of abstract watermelon art lies in its imperfection – those slightly messy edges and organic shapes create character and artistic authenticity.
You can create a cohesive look by using the same color palette across all nails while allowing each nail to have its own distinct abstract composition.
This artistic approach feels sophisticated and gallery-worthy while maintaining that playful watermelon spirit that brings joy to your everyday routine.
Watermelon Slice Cuticle Design

Focus attention on your cuticle area with charming watermelon slice designs that create a unique reverse French manicure effect.
Paint the majority of each nail in a neutral or clear base color that lets your cuticle watermelon designs take center stage.
Create small watermelon slice semicircles along your cuticle line, positioning them like tiny fruit slices peeking up from the nail base.
Start with pink semicircles that represent the watermelon flesh, making sure they’re evenly sized and positioned for a cohesive appearance.
Add thin green crescents along the bottom edge of each pink semicircle to represent the watermelon rind section.
The white separation line appears as a delicate curve between the pink flesh and green rind areas, completing the watermelon slice illusion.
Dot tiny black seeds within the pink semicircles, keeping them proportionally small since you’re working in a limited cuticle space.
This technique creates an unexpected twist on traditional nail art placement, drawing attention to an often-overlooked area of your manicure.
The cuticle focus makes this design perfect for people who prefer subtle nail art that’s interesting without being overwhelming or attention-grabbing.
You can vary the number of watermelon slices per nail based on your nail width and personal preference for coverage.
This design works beautifully with both short and long nails since the focus remains concentrated in the cuticle area regardless of nail length.
Try alternating between different watermelon slice sizes on each nail to create rhythm and visual movement across your entire manicure.
The reverse placement feels fresh and modern while maintaining all the charm and playfulness that makes watermelon nail art so appealing and fun.
Glitter Watermelon Sparkle

Add glamorous sparkle to your watermelon design with strategic glitter placement that catches light and creates magical shimmer effects.
Start with your basic watermelon color scheme but incorporate glitter polishes or loose glitter for extra dimension and visual interest.
Use pink glitter over your watermelon flesh sections to create depth and texture that mimics the crystalline appearance of fresh fruit juice.
Apply green glitter to the rind sections for a unique twist that makes your watermelon design feel more glamorous and party-ready.
The white separation lines can feature subtle silver or white glitter that adds elegance without overwhelming the overall watermelon color story.
Instead of traditional black seeds, try using tiny black glitter pieces that catch the light and create more dynamic visual interest.
Layer different glitter sizes from fine shimmer to chunky hexagonal pieces for varied texture that adds complexity to your design.
This sparkly approach transforms casual watermelon nail art into something suitable for special occasions, parties, and evening events.
The glitter catches light beautifully, creating movement and dimension that makes your watermelon design come alive under different lighting conditions.
You can control the glitter intensity by applying it lightly for subtle shimmer or building up layers for maximum sparkle and drama.
Try using holographic glitter that shifts colors in the light, adding an extra magical element to your already eye-catching watermelon design.
The combination of playful watermelon themes with glamorous glitter creates the perfect balance between fun and sophistication.
This sparkling version works beautifully for summer parties, festivals, and any occasion where you want your nails to be absolutely show-stopping and memorable.
3D Watermelon Texture

Create dimensional nail art that you can actually feel with raised watermelon designs that add tactile interest to your manicure.
Use thick gel polish or nail art clay to build up textured areas that mimic the bumpy, natural surface of real watermelon skin.
Start with your base watermelon colors but add dimensional elements using dotting tools, sponges, or texture brushes for realistic surface variation.
Create raised seed areas using small beads, caviar pearls, or thick black polish that’s been built up for a three-dimensional effect.
The rind sections can feature textured green polish applied with stippling techniques that create the rough, natural appearance of watermelon skin.
Use matte and glossy top coats strategically to create contrast between different areas and enhance the three-dimensional appearance.
This technique requires more time and patience but creates stunning results that feel like miniature watermelon sculptures on your fingertips.
The textured approach adds a luxurious, salon-quality feel to your watermelon nail art that sets it apart from flat painted designs.
You can incorporate other dimensional elements like tiny rhinestones or metallic studs to represent dewdrops or add extra sparkle and interest.
This 3D technique works best on shorter nails where the raised elements won’t interfere with daily activities or catch on clothing and accessories.
The tactile quality makes this design incredibly satisfying to look at and touch, creating a multi-sensory nail art experience.
Try combining different texture techniques on various nails to create a cohesive but varied 3D watermelon garden across your fingertips.
This advanced technique showcases serious nail art skills while maintaining that playful watermelon charm that brings smiles and compliments wherever you go.
These watermelon nail art designs prove that summer manicures can be both playful and sophisticated, giving you endless ways to express your fruity style.