I used to leave every party looking like I’d been crying, even when I hadn’t.
By hour three, my smokey eye would slide down into these sad little gray crescents under my lashes.
And I’d catch my reflection in someone’s phone camera and just cringe.
So I spent way too many nights testing formulas, techniques, and honestly some questionable TikTok hacks, just to figure out how to make this look actually survive.
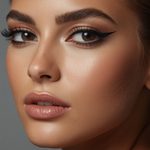
Now my smokey eye makes it from the pre-game selfie to the diner booth at 2am without a single smudge.
I’m not exaggerating when I say it changed how I feel walking into a room.
If you’ve ever felt that specific kind of deflated when your makeup gives up before you do, this one’s for you.
Why Your Smokey Eye Is Quitting on You By 9pm

Okay so let’s talk about what’s actually happening on your lid.
Most smokey eyes fall apart because of oil, not because you did the blending wrong.
Your eyelids produce more oil than almost any other part of your face.
And that oil breaks down pigment, especially with cheaper or older shadow formulas.
Add in a little sweat from dancing or just being warm in a crowded room, and it’s basically a slip n slide up there.
Then there’s the blinking factor, which nobody talks about enough.
You blink around fifteen to twenty times a minute, and every single blink is a tiny opportunity for pigment to transfer.
I didn’t understand any of this for years, I just kept blaming my “bad eyelids.”
Turns out my eyelids were fine, my routine just wasn’t built for the reality of how skin behaves.
Once I started treating oil control as step one instead of an afterthought, everything shifted.
It’s kind of like building a house on sand versus concrete, you know?
The shadow was never the problem, the foundation was.
So before we even get to color, we have to talk prep, because that’s genuinely where the magic happens.
The Primer Step I Used to Skip (Never Again)

I’ll be honest, I used to think eyeshadow primer was a scam.
Like, an extra step just to sell me another product, that’s what I assumed.
Then I tried a full smokey eye with and without primer on two separate nights, same shadow, same everything else.
The difference was almost embarrassing.
Without primer, my look started fading around hour two.
With primer, it was still crisp past midnight.
A good primer does two things at once, it soaks up excess oil and it gives the pigment something to grip onto.
Think of it like taping off a wall before you paint, the color just goes on cleaner and stays put.
I like a primer with a slightly matte, tacky finish, because that tackiness is literally what holds your shadow in place.
If your lids run oily, look for one with silica or clay listed near the top of the ingredients.
If your lids are more on the dry side, a cream-based primer will feel a lot more comfortable and won’t emphasize any texture.
My little tip here, don’t rub it in like lotion.
Pat it on with your ring finger and let it set for a solid thirty seconds before you touch a brush to it.
That pause matters more than people think, it lets the primer actually grip your skin instead of just sliding around under your shadow.
Powder vs Cream: Picking the Right Smokey Eye Formula

This is the debate I get asked about constantly, and honestly the answer depends on your skin.
Powder shadows are my go-to for anyone with oilier lids, because powder formulas tend to have more built-in oil absorption.
Cream shadows look gorgeous and blend like a dream, but on oily lids they can actually move around more as the day goes on.
That said, cream isn’t the enemy, it just needs backup.
If you love a cream shadow, and I totally get it because the texture is so buttery and satisfying, set it with a translucent powder immediately after applying.
Just press a fluffy brush with a little powder right on top while the cream is still fresh.
It locks everything in place almost instantly.
My personal combo, and I’ve been loyal to this for over a year now, is a cream base pressed all over the lid first for richness and depth.
Then I layer a matte powder shadow on top in the crease and outer corner.
You get the best of both worlds this way, the pigment payoff of cream with the staying power of powder.
If you’re someone who’s always in a rush in the morning, powder alone is honestly the lower maintenance route.
But if you’ve got even five extra minutes, the cream and powder combo is worth it every single time.
Tightlining: The Waterline Hack That Changed Everything For Me

Nobody warned me about the waterline for years, and I genuinely think that was my biggest mistake.
Your waterline is basically ground zero for smudging, because it’s constantly wet from your natural tear film.
If you skip it entirely, you’ll end up with this weird gap of visible skin between your lashes that makes the whole look feel unfinished.
But if you fill it with the wrong product, it’ll bleed and migrate within the hour.
The trick is tightlining instead of just lining the waterline itself.
Tightlining means you gently lift your lid and press a pencil or gel liner right into the base of your upper lashes, into that tiny strip of skin most people ignore.
It tints the roots of your lashes dark without actually sitting in the wet waterline where it would just smear.
I use a waterproof gel liner with a small angled brush for this, patience is honestly the whole game here.
Go slow, blink a few times to check your work, and build it up in thin layers rather than one thick swipe.
For my lower waterline, I only use a waterproof black or dark brown pencil, never a regular one.
And even then I set it with a tiny bit of matching eyeshadow pressed on top with a small brush.
This one step alone cut my midday panda-eye moments down by like ninety percent, no joke.
Blending Technique That Actually Locks Pigment In Place

Here’s something I wish someone had told me sooner, how you blend affects how long your look lasts, not just how it looks.
When you swirl your brush around in big circles, you’re actually disturbing the pigment and pushing it into your fine lines and creases.
Instead, use a light stamping or patting motion, especially in the crease.
I know it feels slower and less satisfying, but it keeps the shadow sitting on top of your skin instead of working its way into every little line.
For the transition shade, use a clean fluffy brush and gently buff back and forth in a small area, not your whole lid at once.
Small movements give you way more control and honestly a much softer gradient too.
When you’re building depth in the outer corner, use a smaller, denser brush and really pack the color in rather than dragging it around.
Packing means pressing the brush down and lifting straight up, over and over, in the same spot.
It sounds tedious but it takes maybe an extra thirty seconds and the payoff is huge.
My rule of thumb, if my brush is dragging color across the lid instead of pressing it in, I’m doing it wrong.
Slow down, breathe, and let the brush do less traveling and more pressing.
Trust me, your future self at midnight will thank you.
Stopping the Crease Before It Even Starts

Undereye creasing is sneaky because it doesn’t show up right away, it creeps in slowly over hours.
It happens when your natural oils mix with your eyeshadow and settle into the little lines of your lid.
The number one fix, and I cannot stress this enough, is setting your concealer and any base products with powder before you even start on shadow.
If your concealer is still creamy when you start applying eyeshadow, the shadow has nothing stable to sit on.
I press a small amount of translucent setting powder under my eyes and let it sit for a full minute before I dust off the excess.
That waiting period matters, it lets the powder fully absorb the moisture instead of just sitting on the surface.
Another sneaky culprit is heavy, overly hydrating eye cream applied right before makeup.
I love a good eye cream, don’t get me wrong, but I apply mine at night or at least twenty minutes before I start my makeup, never right before.
If you’re in a rush, blot your lid gently with a tissue before priming to remove any excess product.
My go-to combo for stubborn creasers is primer, then a light dusting of setting powder over just the lid, and only then the shadow.
It feels like overkill until you realize you made it through an entire wedding reception with zero creasing.
Once you feel that, you don’t go back.
Mascara and Lashes That Won’t Betray You By Midnight

A gorgeous smokey eye with smudged mascara underneath just reads as tired, not smoky and sultry.
So this step matters more than people give it credit for.
I always reach for a waterproof formula for nights I know will be long, sweaty, or emotional in any way.
Waterproof formulas used to feel stiff and flaky to me, but the newer ones have genuinely gotten so much better and softer.
Before applying, I always do a light dusting of translucent powder on my lashes between coats, it’s such an old trick but it still works so well.
It adds volume and also helps the next mascara coat grip better and last longer.
If you wear falsies, go for a strip lash with a thinner, more flexible band, because thick bands tend to lift at the corners as the night goes on.
And use a lash glue that dries clear and stays tacky just a touch longer, so you have a few extra seconds to adjust placement.
My personal hack, apply your lash glue, wait about thirty seconds until it turns from white to clear and gets slightly tacky, then place your lash.
That little pause makes the hold so much stronger than applying it while it’s still wet.
For your lower lashes, keep it minimal, just a light coat, because heavy lower lash mascara is one of the most common smudge culprits I see.
Less really is more down there, trust me on this one.
The Tiny Touch-Up Kit That Saves Every Night Out

I keep a small pouch in my bag now, and it has genuinely saved me more times than I can count.
It’s nothing fancy, just a few essentials that take up almost no space.
A cotton swab, a travel-size makeup remover wipe cut in half, and my exact liner and mascara in mini form.
The cotton swab is for precision fixes, like if a tiny bit of liner smudges under your lash line.
Dip it very lightly, and I mean barely, in makeup remover and gently clean just that one spot without disturbing anything else.
I also carry a small flat concealer brush, because sometimes you just need to touch up one tiny corner instead of redoing your whole under eye.
A little translucent powder in a compact rounds out the kit perfectly.
If you feel any oil building up around hour four or five, a quick blot and a light powder dust resets everything without adding more product on top of product.
My honest tip, do these touch-ups in the bathroom with good lighting if you can, not by your phone flashlight in a dim hallway.
Phone flashlight touch-ups have ruined more looks than they’ve saved, I promise you.
This little kit weighs almost nothing, and it’s the difference between panicking in a bathroom line and confidently reapplying lip gloss instead.
My Go-To Product Combo I Reach For Every Time

I get asked what I actually use more than almost anything else, so here’s my honest, no-fluff combo.
I start with a matte, tacky-finish eyeshadow primer, patted on and given time to set.
Then a cream shadow in a deep taupe pressed all over the lid for richness.
I set that with a matte brown powder shadow in the crease using small pressing motions.
For the outer corner and lower lash line, I pack in a deeper charcoal powder shadow to really smoke it out.
My tightlining pencil is a waterproof gel formula in a soft black brown, which feels a little more flattering than true black on most people.
Mascara is always waterproof on big nights, applied in thin, deliberate coats with a little translucent powder dusted between layers.
And I finish with a light mist of setting spray held about eight inches from my face.
I know setting spray sometimes gets skipped as a “nice to have,” but honestly it’s earned a permanent spot in my routine.
It just melds everything together and adds this extra layer of staying power that’s hard to explain until you feel it yourself.
This combo has survived weddings, birthday parties that turned into dance floors, and one memorably long airport layover.
If you only take one thing from this whole post, let it be this exact lineup.
Easy Variations Depending On Your Night

Not every smokey eye needs to be full intensity, and honestly some of my favorite looks are the softer versions.
For a first date, I like to keep things warmer and softer, swapping charcoal for a soft brown or bronze tone.
It still reads as smokey but feels a little gentler and more approachable up close.
For a work event or something more polished, I’ll skip the lower lash line smoke completely and just keep it on the lid and crease.
It gives you that “put together” smoky look without feeling like you’re going out afterward.
For an actual night out, I go full intensity, lid, crease, outer corner, and a soft smudge along the lower lash line too.
This is where the charcoal and true black pencil come out to play.
If I had to pick one variation to recommend to almost anyone starting out, it would be the “no black” version.
Deep browns and warm taupes are so much more forgiving and honestly still look incredibly smoky and sultry.
They photograph beautifully too, which matters more than we admit sometimes.
My last variation tip, if you’re someone with lighter eyes, try a plum or deep berry tone instead of straight gray or black one night.
It makes your eye color pop in this really unexpected way, and it still gives you all that moody, smoked-out feeling.
Taking It Off Without the Panda Eye Aftermath

Removing a heavy, long-wearing smokey eye is its own little skill, and rushing it always backfires.
If you scrub at waterproof formulas, you’re just dragging pigment into your fine lines and basically creating the exact panda eyes you spent all night avoiding.
I always start with a proper oil-based makeup remover or cleansing balm, because oil breaks down waterproof formulas so much more gently than micellar water alone.
Saturate a cotton pad, press it against your closed eye, and just hold it there for a solid ten seconds.
Don’t wipe yet, just let it sit and soften everything first.
Then use gentle downward swipes, following the natural direction your lashes grow.
For the tightlined waterline, a cotton swab dipped in remover works so much better than a cotton pad, since you can get right into that tiny space.
Go slow here, your waterline area is delicate and doesn’t need aggressive rubbing.
Once the bulk of it is gone, I follow up with a gentle cleanser to make sure everything is actually off, not just smeared thinner.
My honest confession, I used to skip this whole process and just wash my face like normal, and I’d wake up looking like I’d been in a bar fight.
Doing it properly takes maybe an extra ninety seconds, and it’s saved my under eye skin so much unnecessary irritation over the years.
Your skin will genuinely thank you for this one.
The Mistakes That Are Quietly Ruining Your Look By 9pm

Let’s talk about the small stuff that adds up to big smudging, because I’ve made every single one of these.
Touching your eye area throughout the night is probably the biggest one, and it’s so hard to notice yourself doing it.
Every little rub transfers oil from your fingertips right onto freshly set makeup.
Skipping primer because you’re in a rush is another classic, and I get it, but it’s the step that does the most heavy lifting.
Using a heavy, hydrating moisturizer right up to your lash line before applying shadow is a sneaky one too.
It feels harmless but it creates a slippery surface that pigment just can’t hold onto.
Applying too much product at once instead of building in thin layers is another common one.
Thick layers take longer to dry and set, which gives them way more time and opportunity to smudge before they’ve locked in place.
Not waiting between steps is honestly underrated as a mistake, everyone’s in a rush and skips the little pauses.
Give your primer, your concealer, and even your liner those few extra seconds to actually set before moving on.
And skipping setting spray because it feels like an unnecessary extra step, that one’s sort of my personal pet peeve at this point.
It’s such a small effort for such a noticeably longer-lasting result.
Fix even two or three of these habits and I promise you’ll notice a real difference by your very next night out.